
- The following instructions are for a first-time garbage disposal installation. If replacing a garbage disposal, click here for instructions.
- Prep for install.
Turn off electrical power at circuit breaker or fuse box and disconnect the sink drain. - Install the new sink flange.
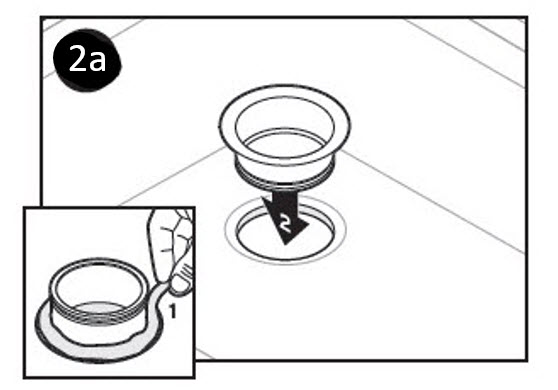
(a) Models without a rubber gasket: Place a 1/2" rope of plumber's putty around the sink flange. Drop the new sink flange into the drain opening and press it into place. Remove excess putty.
(b) Models with a rubber gasket: Firmly press sink flange and rubber sink gasket into the sink opening. - Attach mounting assembly.
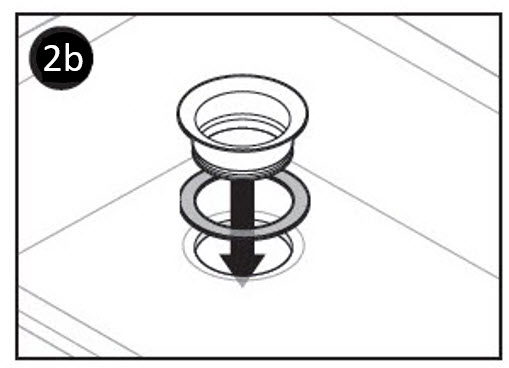
Placing a weight, such as your garbage disposal, on top of the sink flange will help hold the sink flange in place while mounting it to the sink. To avoid scratching your sink or the flange, place a towel between the sink surface and the weight.
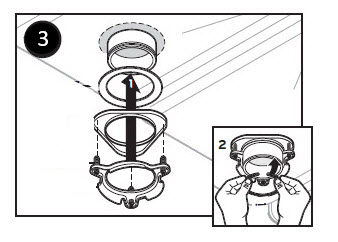
From under the sink, (1) slide the fiber gasket, backup flange and mounting ring over the sink flange. Hold these pieces in place while inserting the snap ring.
(2) Pull the snap ring open and press firmly until it snaps into place. Tighten the mounting screws, alternately tightening each screw a few turns at a time until the mounting assembly is evenly and tightly seated against the bottom of the sink. If the sink is more than 3/8" thick, use the shorter (1-1/8") screws. - Connect the electrical.
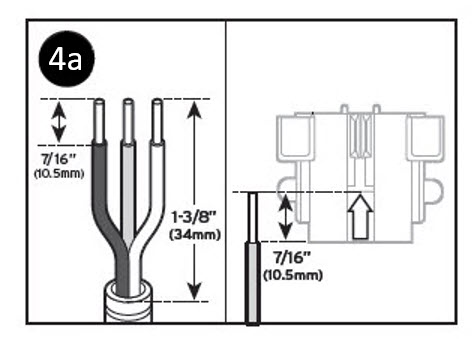
Hardwired Unit: (a) Prep wiring so that 1-3/8" extends from the jacket. Strip wiring ends 7/16". Verify correct length with arrow embossed on underside of EZ Connect Hardwire Adapter.
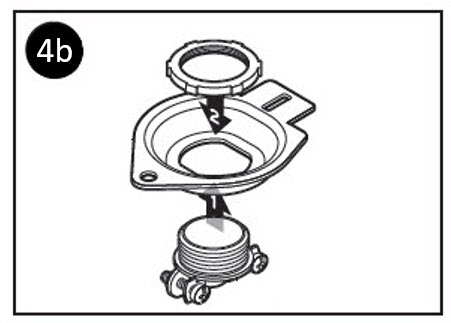
(b) Remove nut from cable strain relief. From the bottom, (1) install threaded portion of strain relief into cover plate and (2) secure from above with nut.
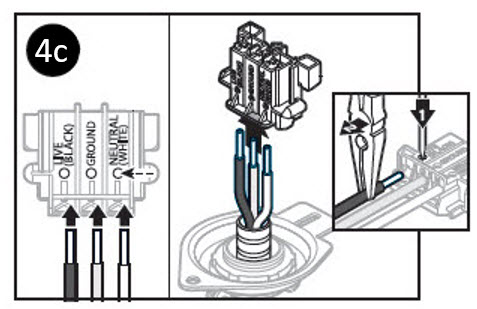
(c) Insert cable with prepped wiring through strain relief/cover plate assembly. Verify proper wire connection locations on side of hardwire adapter: Live (black wire), Ground (green/bare wire), Neutral (white wire). Insert wires into proper locations on adapter and push to lock.
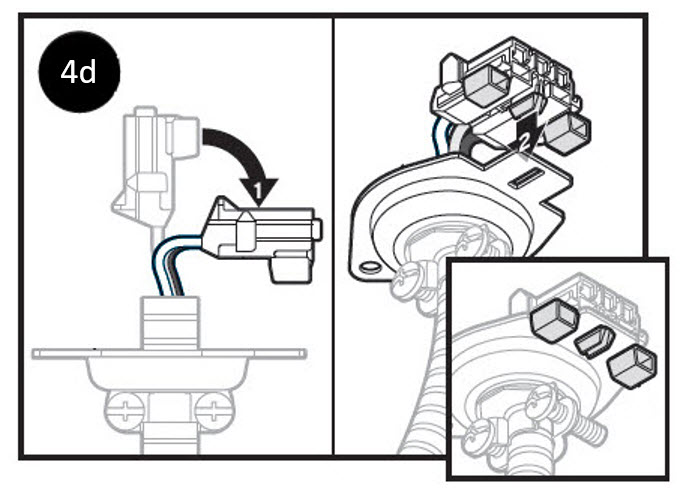
(d) Bend adapter downward (approximately 90°). Align and push adapter onto cover plate until plastic latch locks into the plate's slot.
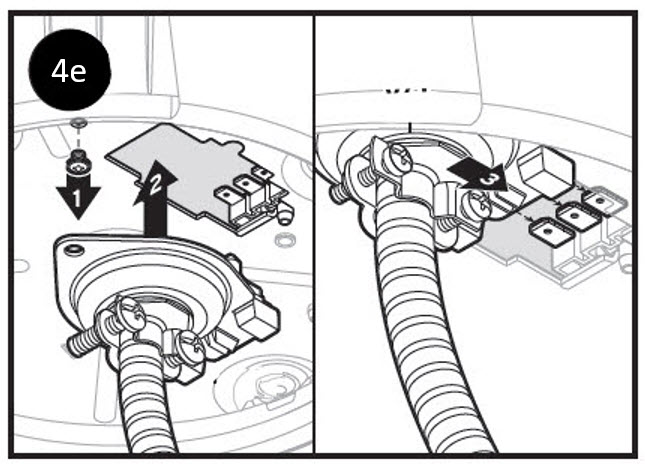
(e) Tighten cable strain relief screws. Remove the ground screw from the bottom of the disposer. Insert the adapter/cover plate assembly into cut-out on bottom of disposer and push assembly forward to connect power.
Install and tighten ground screw through the cover plate and into bottom of disposer.
NOTE: EZ Connect Hardwire Adapter is designed to work with a Romex or BX cable. It should not be used with a standard 3-prong power cord.
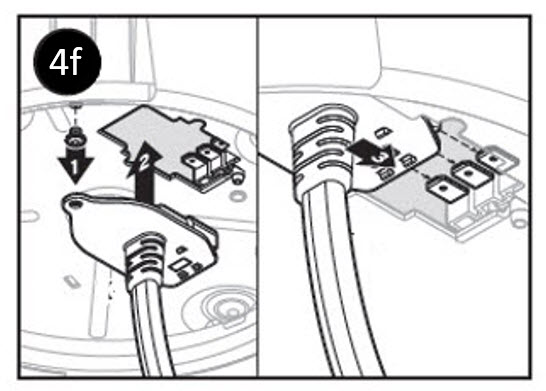
Corded Unit: (f) Remove ground screw from bottom of disposer. Insert EZ Connect Power Cord into cutout on bottom of disposer and push forward to connect power to disposer.
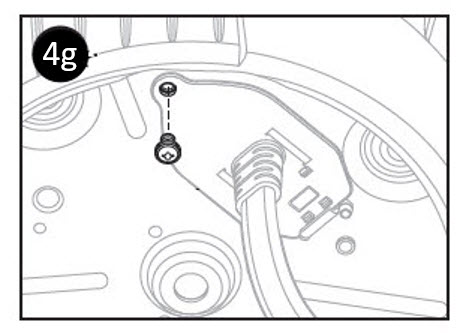
(g) Install and tighten ground screw through cord and into bottom of disposer. - Connect plumbing.
DO NOT insert fingers into discharge opening. You may need to trim the discharge tube to ensure proper fit.
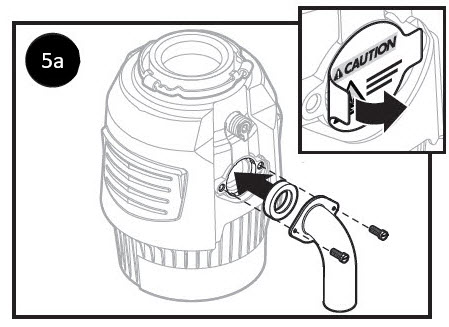
(a) Models with tailpipe gasket/flange: If label is present on discharge, remove. Slide flange over discharge tube and insert tailpipe gasket into discharge outlet of disposer. Secure tailpipe gasket/flange assembly with bolts.
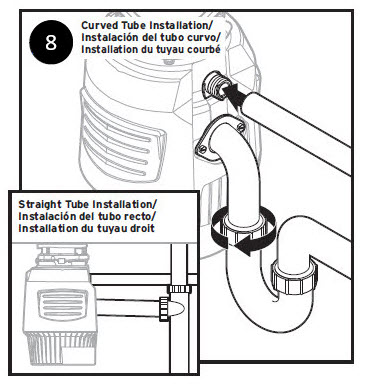
NOTE: Although the supplied curved discharge tube is preferred, a straight discharge tube may be used but should be installed with a slight downward pitch to avoid risk of water leakage.
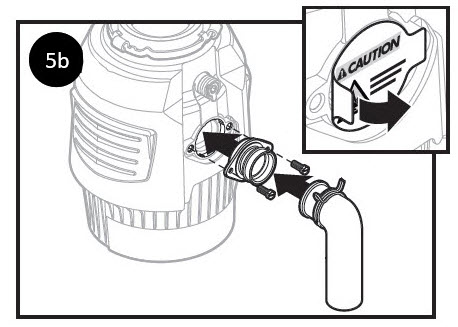
(b) Models with Anti-vibration Tailpipe Mount: If label is present on discharge, remove. Insert Anti-vibration Tailpipe Mount into discharge outlet of disposer. Secure tailpipe mount with bolts. Insert discharge tube into tailpipe mount and secure with spring clamp.
NOTE: Although the supplied curved discharge tube is preferred, a straight discharge tube may be used but should be installed with a slight downward pitch to avoid risk of water leakage. - Connect disposer to mounting assembly.
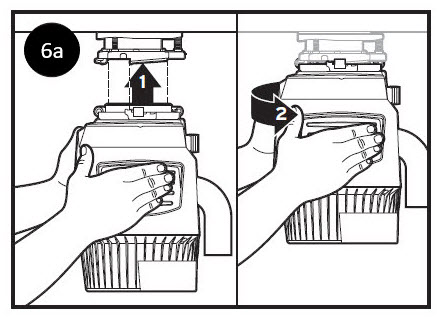
NOTE BEFORE INSTALLING THE DISPOSAL: Lift & Latch Technology features a lower mounting ring that is fixed with a tab; the lower mounting ring will not turn freely on the disposal (this is intentional for ease of installation and lifting the disposal with two hands).
Tip: Review how the lower mounting rings interact with the ramps on the bottom of the flange prior to install.
(a) Lift the disposal to align with flange. Ensure all three (3) mounting tabs on the lower mounting ring are aligned with the lowest part of the three (3) ramps on the flange. Slightly push/compress the mounting gasket against the flange and turn the disposal to the right to slide up the ramps. Verify all three tabs are engaged on the flange ramps.
Once the lower mounting ring is secure on the flange ramps, the disposal will rotate freely. Rotate the disposal to the right and align with plumbing. Do not turn the disposal to the left as it could fall off the flange ramps.
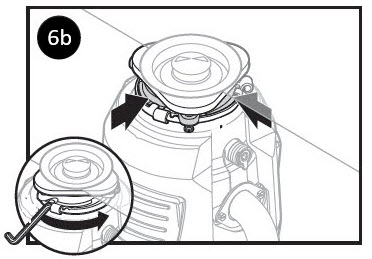
(b) Lock the flange in place by using a 1/4-inch Allen wrench or screwdriver for leverage. Insert the Allen wrench/screwdriver in one of the hooks on the lower mounting ring and turning right until all three tabs are over the ridges on the high side of the ramps.
Tip: Pliers can also be used to help secure the disposal on the ramps by clasping one end on a hook and the other end on one of the three lobes of the flange.
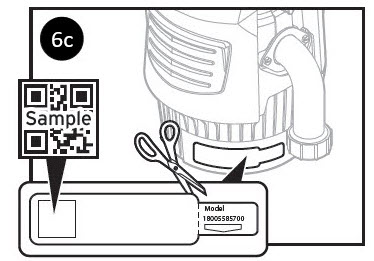
(c) Detach removable portion of spec label and place on a visible location. - Remove dishwasher inlet plug. (FOR DISHWASHER CONNECTION ONLY)
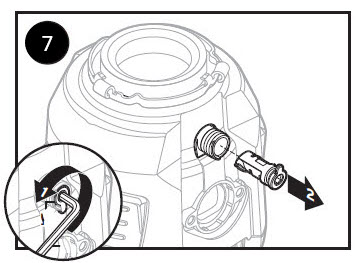
(1) Insert wrenchette into dishwasher inlet plug and turn 90° counter-clockwise to (2) remove. - Connect disposer to plumbing and check for leaks.
Rotate disposer to align with plumbing and reconnect plumbing (and dishwasher reconnection if used).
To test for leaks, insert the sink baffle into the sink flange and press down evenly until it snaps into place. Insert stopper into sink opening, fill sink with water, remove stopper to drain, then look under the sink for leaking water.
Reconnect electrical power at fuse box or circuit breaker box, and your disposer is ready for use!
Need additional help? Contact Us